

CHIMERA / GETTING STARTED
Basic Setup
Set up Chimera for your game and run your first patrol. Follow one lesson at a time.
Have ready: your Windows PC, MMOViper account with Chimera access, your game, and its current setup notes and plugin keys. The videos demonstrate ESO; use your own game’s controls and plugin requirements.
STEP 1 OF 7
Download and install
Watch Download Chimera
0:40 · Click to watch larger
Do this
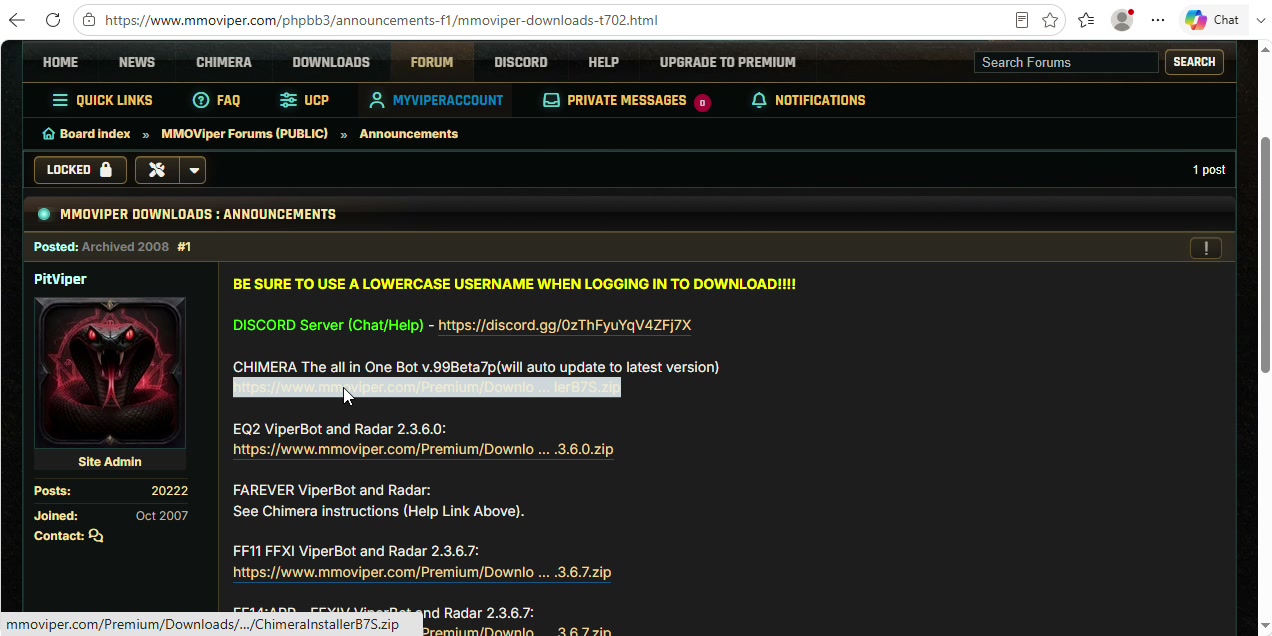
- Open Downloads and choose the Chimera package. Sign in if asked.
- Extract the ZIP into a folder you can find again. Keep its files together.
- Open that folder and launch Chimera.exe. Sign in with your MMOViper account when prompted.
Check: Chimera is open and you can reach its main window.
If yours differs
The Downloads page also lists older ViperBot packages. Use the Chimera entry; its ZIP filename can change between releases.
STEP 2 OF 7
Create your profile and load plugins
Watch Profile and plugins
2:52 · Click to watch larger
Do this
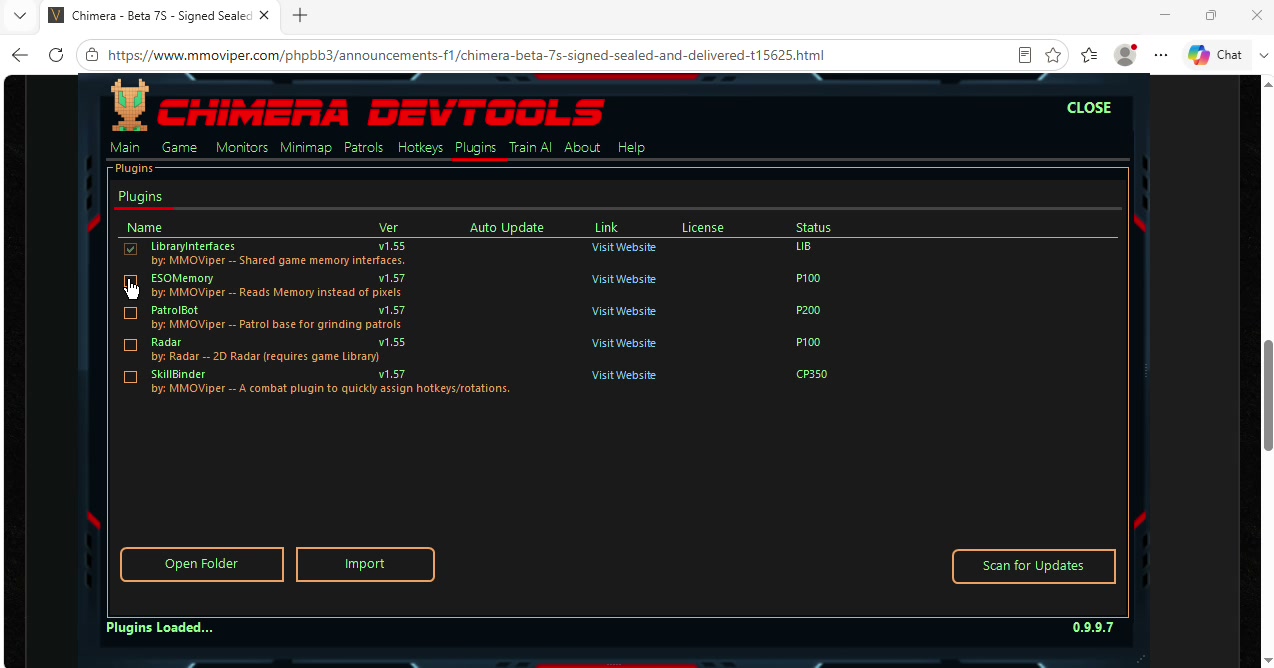
- Launch your game. In Chimera, open Game → New, name the profile for your game and select its window/process.
- Follow the setup notes on the plugin page where you obtained your import code for your selected game. This patrol workflow uses PatrolBot and SkillBinder, plus the prerequisites listed there.
- In Plugins → Import, paste each required key and confirm. Leave already-installed prerequisites in place, then enable the workflow plugins using their checkboxes.
- Save the profile. Confirm the expected plugin tabs/settings are available.
Check: Your game profile is saved and the required plugins are enabled.
If yours differs
Video example — ESO: the recording uses ESOMemory, PatrolBot and SkillBinder. The recorded example’s setup notes and keys are for that demo; choose the instructions and keys for your own game. LibraryViper is a shared-library row; its checked box may be greyed out. Leave the library in place. Radar is optional for this patrol.
STEP 3 OF 7
Set movement controls and calibrate if required
Watch Movement setup
5:10 · Click to watch larger
Do this
- Check the plugin page where you obtained your import code. Follow its movement instructions and check whether turn calibration is required.
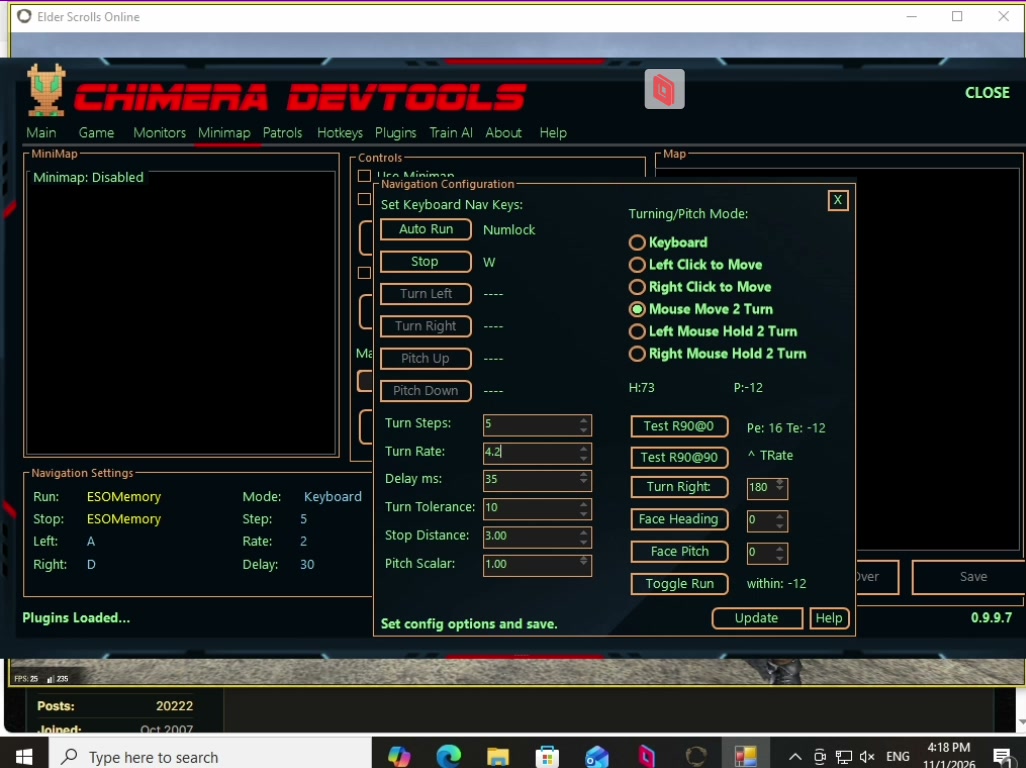
- If movement setup is required, open Minimap → Config. Set the controls and movement/turning mode specified on that page, including any required mouse button.
- If turn calibration is required: run Test R90@0 and check TE (turn error). Adjust Turn Rate using the on-screen guidance, aiming for TE:0, then repeat to confirm. If calibration is not required, skip the turn test.
- If you changed the configuration, click Update, close it and save your profile.
Check: Your movement setup follows the plugin page, any required turn calibration is complete, and your changes are saved.
If yours differs
Movement controls and calibration requirements vary by game and plugin, including between memory-based setups. Your plugin page determines whether to use keyboard or mouse controls and which tests apply. The video demonstrates one ESO setup. R90@0 requests a 90° right turn at zero pitch; facing north is an optional reference, in which case the turn should finish facing east. TE:0 means the measured turn matched the requested angle; “within tolerance” is different from exact zero.
STEP 4 OF 7
Record a short patrol route
Watch Record your route
2:21 · Click to watch larger
Waypoints tell Chimera where you want the patrol to go, such as places to search for targets. When your setup uses a mesh, it helps Chimera find a route to those places and nearby targets. Choose useful destinations; they do not need to mark every step you take.
Do this
- Choose a patrol. Open Patrols. Use New to create a named patrol, or select the one you intend to edit.
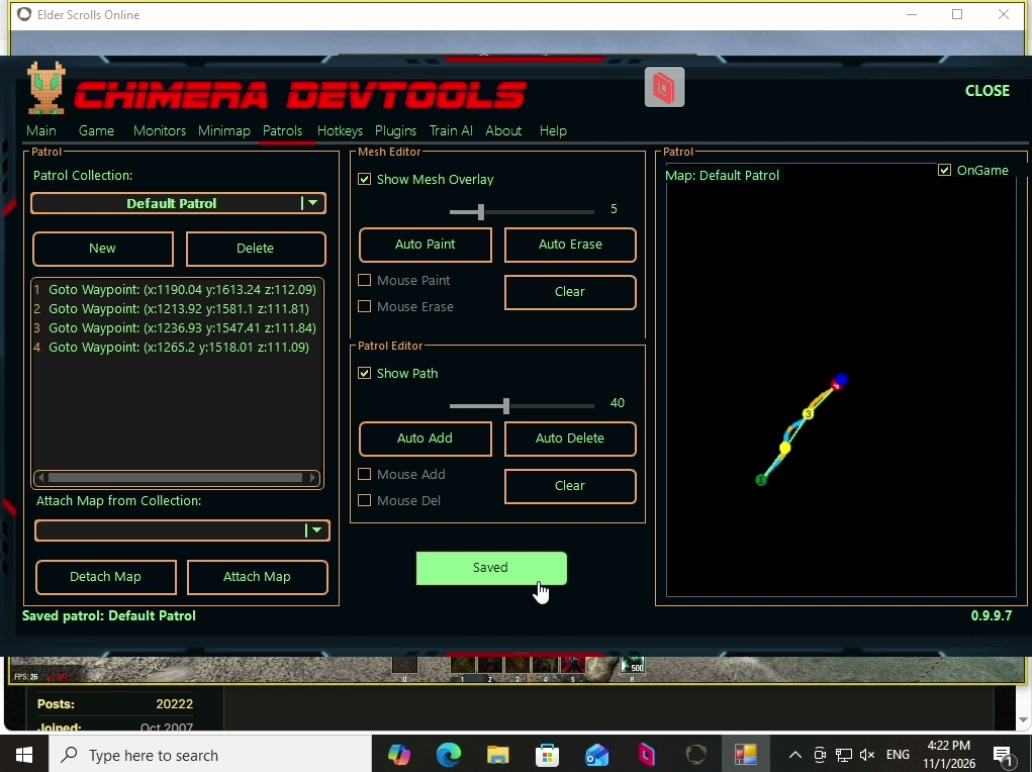
- Map the travel area, if required. In Mesh Editor, click Auto Paint and walk through the area your patrol will need to use. Its slider controls how wide an area is painted. Press Stop Auto in Mesh Editor when finished. You can do this with Auto Add switched off.
- Add individual stops where they are useful. Move to a spot you want the patrol to visit, such as near the mobs you plan to fight. Click the last row in the patrol task list (or the empty list), press Shift + Insert, then double-click the new row. Choose Select Task → Navigation → Goto Waypoint and confirm the current position. Repeat at your other chosen stops.
- Automatic waypoints are an alternative. If evenly spaced stops suit your patrol, use Auto Add in Patrol Editor instead of adding each stop yourself. Walk the route, then press Stop Auto. Its distance slider sets waypoint spacing; lower values place stops closer together. It does not change the mesh.
- Check and save. Show Path displays the waypoints and their connections; Show Mesh Overlay displays the mesh; OnGame puts the preview over your game. Check that the stops are useful and any mesh covers the ground needed to reach them and nearby targets. Click Save Patrol (shown as Unsaved after changes).
Check: The button reads Saved, your intended stops are recorded, and any required mesh covers the area your patrol needs to use.
If yours differs
The video uses Auto Add as a quick way to create waypoints, but it is optional. Auto Paint and Auto Add work independently: you can map the movement area and then add only the destinations you want. The two sliders control different things—mesh width and waypoint spacing. Follow your plugin setup instructions for whether a mesh is needed; the demo’s slider values are examples.
STEP 5 OF 7
Set your first attack hotkey
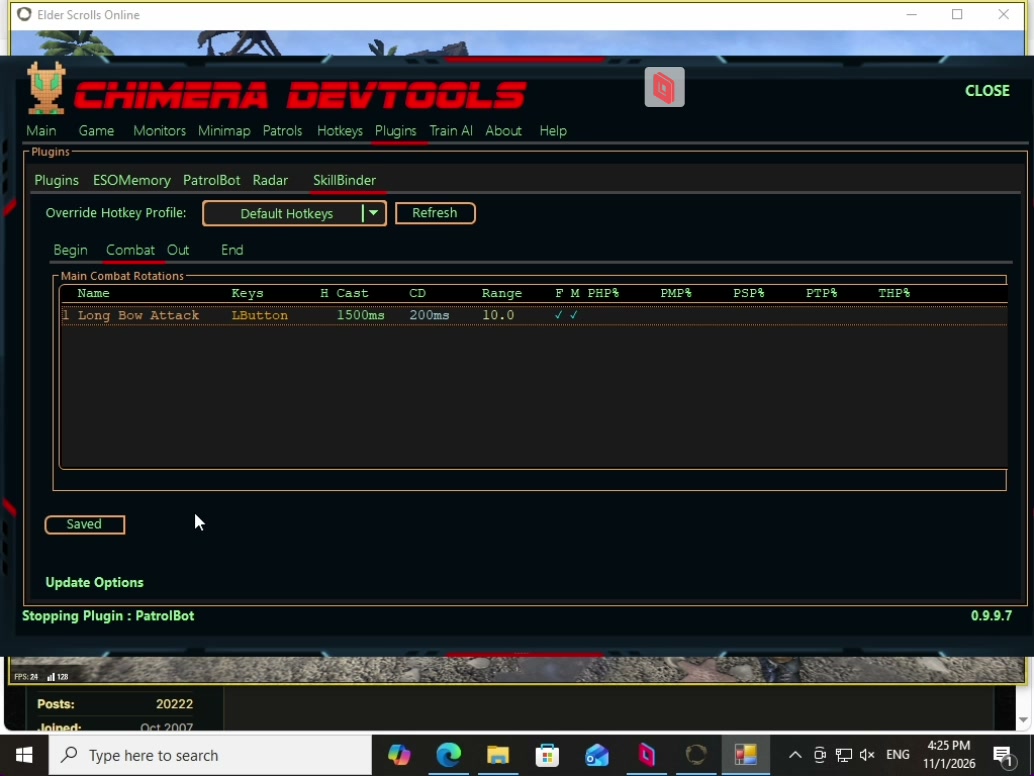
Watch First attack hotkey
1:11 · Click to watch larger
SkillBinder can manage several attacks in one profile. Each time it selects a normal combat action, it checks the list from the top and gives priority to the first entry that is ready and meets its conditions.
Do this
- Open Plugins → SkillBinder and choose your hotkey profile.
- Click Main Combat Rotations and press Insert. Double-click the new row to edit it.
- Set the input and timing. Name the attack and click the button beside Keys to capture its key, mouse button or key combination. CastTime allows time for the action; CoolDown controls how long before this entry can be used again. Both use milliseconds: 1000 ms is one second. Match the values to your game.
- Set priorities when adding more attacks. Add entries the same way and drag them into your preferred order. Ordinary attacks near the top get checked first. If an entry is on cooldown or its conditions are not met, SkillBinder can use an eligible entry farther down the list.
- Optional chained follow-ups. Keep the starting attack unchained. Place its follow-up entries directly below it and enable Chained Ability on those entries. Chained entries are reserved for follow-ups rather than being chosen independently from the normal priority list.
- Save each edited entry and the hotkey profile. Start by checking one attack, then add more entries and check their order and settings.
Check: Your hotkey profile is saved, your first attack has the correct input, and any additional entries have the intended priority and settings.
If yours differs
Other options: Hold while Casting keeps the input held during CastTime. Face Target turns toward the target; Move Into Range tries to move within the configured range. Health and resource limits restrict when an entry can be used, using information available from your game/plugin. A key combination is one input; a chain uses separate ability entries. Video example — ESO: the bow attack uses 1500 ms cast time, 2000 ms cooldown and range 10. These are example values, not defaults. Test your chosen input manually in your game first.
STEP 6 OF 7
Choose targets and patrol options
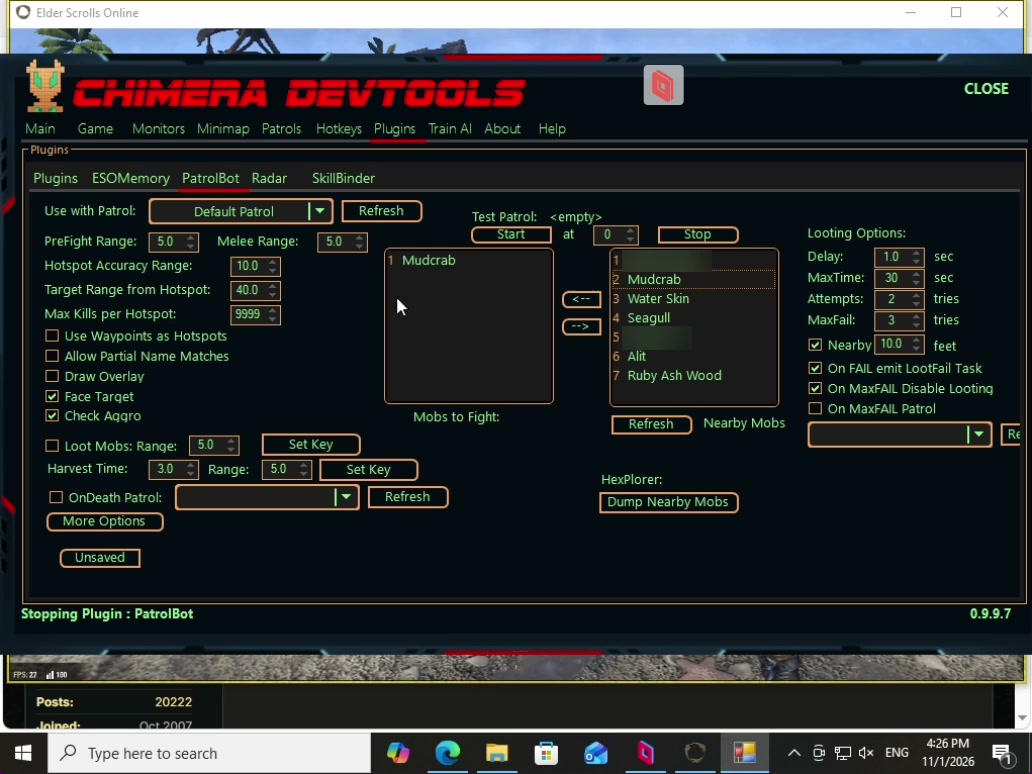
Watch Patrol options
1:16 · Click to watch larger
Build a patrol around the way you want to play. PatrolBot gives you control over which targets to hunt, how far to search, how to approach combat and whether to collect loot. Start with a simple setup, then fine-tune it for your game and preferred combat style.
Do this
- Open Plugins → PatrolBot. Under Use with Patrol, select your saved route.
- Refresh Nearby Mobs. Select the target you intend to fight in your game, then click ← to add it to Mobs to Fight.
- Check the target list and ranges. If you enable looting, set the interact key that works in your game. Save the options.
Check: Your route and intended targets are selected, and the options are saved.
If yours differs
Video example — ESO: the selected target is a Mudcrab. Choose the intended target from your own game. The right-hand list can include players and objects; appearing in Nearby Mobs is not a recommendation to add it.
STEP 7 OF 7
Run, check and stop your first patrol
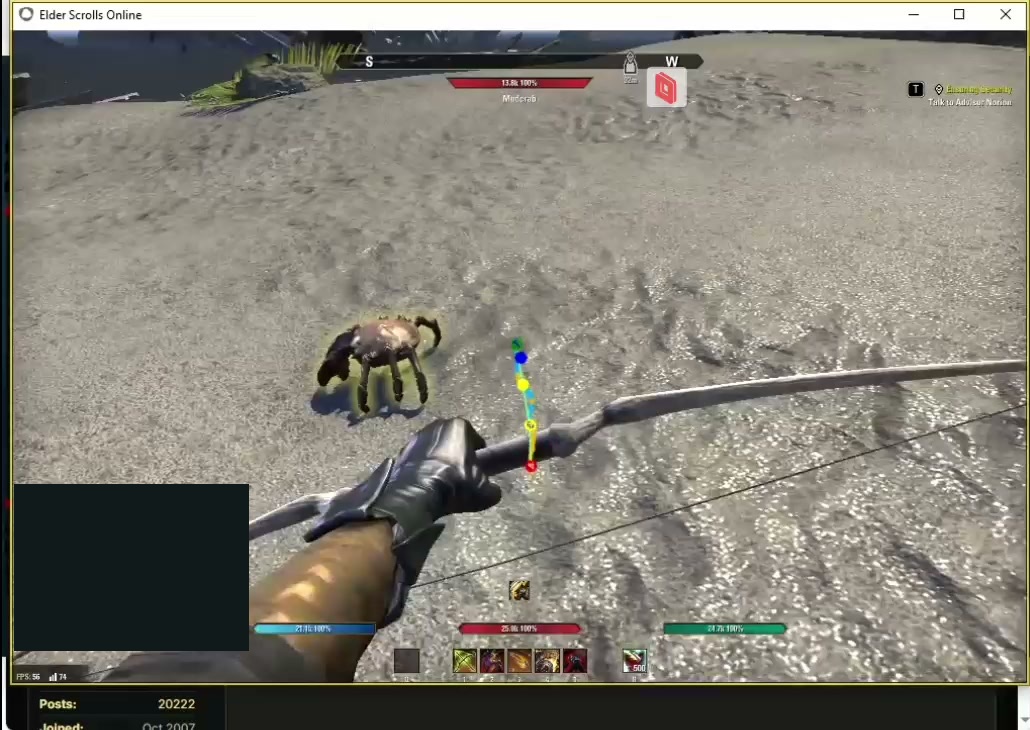
Watch Run your first patrol
2:52 · Click to watch larger
Do this
- On Main, check that the intended patrol and hotkey profile are selected. Before starting, find the Stop button or note its displayed keyboard shortcut so you know how to stop the patrol.
- Press Start and watch the short route. Check movement, the configured attack and looting if enabled.
- Press Stop and confirm automation stops. If something is wrong, stop first and revisit the matching step.
Check: The patrol follows your route, uses the intended action and stops on command.
If yours differs
Keep the first test small. Watch changes as you add more targets, attacks or route complexity.
Need help with a step?
Tell us your game, Chimera version, step number and what happened. Hide account/player names in screenshots.
Ask in the forumBack to ChimeraSee Chimera access
Recorded with ESO · Chimera 0.9.9.7 · November 1, 2026.